Pages

Saturday, 7 April 2018

Introduction To ActiveX Data Objects (ADO)

In today's computing environments, data exists in many formats, ranging from Access and SQL Server databases to Word documents, email messages, and many others. ADO, or ActiveX Data Objects, data-access technology simplifies use of data from multiple sources, thus freeing developers from learning data, vendor-specific API calls, and any other coding minutiae for each data format involved. With ADO, almost any data source becomes accessible in a consistent way for developers creating standalone applications, client/server applications, or ASP pages.

In this chapter, I define ADO in the historic and current context of Microsoft's overall data-access strategy and related technologies.

Monday, 2 April 2018

Creating A Table By Using Application Parts Access 2013

Application parts are predefined templates for creating popular layouts by using different Access objects. Depending on the part you select, you could have a series of steps that further integrate the chosen part with your application. These parts can enable you to add a great new feature to your database with minimum effort, although the choices for tables here are quite limited. 
Choosing an application part can add several objects into your database, including supporting forms and reports. 
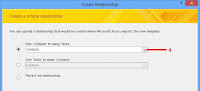
Add an application part:
  1. Click the Create tab. 
  2. Click Application Parts. 
  3. Select an application part. 
  4. In the Create Relationship popup window, select the table to relate this part to, if one is available, and click Next. 
  5. Add an application part 
  6. Choose the field to look up. 
  7. Type a name for the lookup column. 
  8. Click Create. 
  9. Three new design objects have been added to the database. 
  10. The new lookup field now displays data
    from our existing Contacts table.
CAUTION: If you decide to use a primary key, such as an ID, rather than, for example, the contact name, you will need to later use the table design view to adjust your lookup field width because the drop-down lookup box has 0 width when it is a numeric key field. 

TIP: Access supports lookups that can store multiple values. This feature saves you from creating additional tables, which would otherwise be required to hold the multiple selections. In the example, we could have made this selection store multiple contacts against a single task. 

TIP: It is also possible to create your own application part to allow you to quickly add a set of objects to your database. The following article from the Access Team provides details on how to do this: blogs.office.com/b/microsoft-access/archive/2010/03/31/access- 2010-application-parts-and-quick-start-fields.aspx.

Create A New Data Part Access 2013

Create A New Data Part:
  1. With the table in layout view, click the titles of one or more fields. (If necessary, you can use the Shift key to select multiple fields that are next to each other.) 
  2. Click the Fields tab. 
  3. Click More Fields. 
  4. Scroll to the bottom of the list, and select Save Selection As New Data Type. 
  5. Type a name for the data type. 
  6. Type a description for the data type. 
  7. Select a category in which to display the data type. 
  8. Click OK. 
  9. In the message that appears, noting where your new data type has been
    saved in the file system, click OK. 
  10. If you click More Fields again, you can see that your new data type has been added to the list of available data types. You can now add this new data type to a different table by following the steps described in the preceding exercise, “Add a data part,” on page 50.

Working With Data Parts In Layout View Access 2013

Data parts, which are shown in layout view in the More Fields drop-down list, allow you to quickly add one or more fields to a table from a list of prepared fields. For example, adding an Address will add the fields Address, City, StateProvince, ZipPost, and CountryRegion to your table.
You can also select any number of existing fields that you have added to a table, and add them to this list of data parts so that you can easily add those fields to another table.

Add a data part:
  1. With a table open in layout view (for the Customers table in our example), click the Click To Add box at the right of the datasheet. The cursor will then be positioned to add the new fields at the end of the datasheet. 
  2. Click the Fields tab. 
  3. Click More Fields. 
  4. Scroll down the list of available fields, and click the Address field. 
  5. The new fields are automatically added to the design of the table.

Change Field Captions And Descriptions Access 2013

Change Field Captions And Descriptions:
  1. Click the Fields tab. 
  2. Click the ContactName field. 
  3. Click Name & Caption. 
  4. In the Enter Field Properties popup window, change the Caption field to Contact Name, and for the Description type Name of company contact. 
  5. Click OK. The title for the column is now displayed with a space via the Caption property, and the description will be displayed on the lower left on the status bar. 
TIP: One of the most common field data types to add is Short Text. The default field size is 255 characters (shown on the ribbon below Default Value). If you need only 20 characters, reducing the field size can help prevent you from accidentally storing more information than can be displayed—for example, when you have positioned a field on a form or report to be a specific size. Otherwise, do not worry about making it smaller just to save space.

Creating A Table In Layout View Access 2013

The layout view in Access can be used for tables, forms, and reports, and it enables you to make design changes without using the more complex design view. You can make changes and, at the same time, see how the design will finally look. In layout view, you have less control over detailed choices, but you have a faster and more intuitive interface through which to interact with the table.
In layout view, Access automatically adds a unique AutoNumber primary key, called ID, to your blank table design. After working in the layout view, you can always switch to the design view to refine your choices. 
Create a table:
  1. Click the Create tab. 
  2. Click Table. 
  3. Click the Click To Add drop-down list. 
  4. Select a data type. 
  5. Replace the default caption Field1 with a name for the field. 
  6. Click Save. 
  7. Provide a name for the table, and click OK. 

TIP: At this point, you will find it easier both to close the Field List pane on the right and to switch from the Table Tools tab to the Fields tab, which displays the full set of choices for setting properties on each field.

Creating A Table In Design View Access 2013

Creating tables in design view gives you the greatest control over how the fields and properties are set, but it also involves more work than other techniques. Each field in the table design has a set of properties that you can safely leave at the default values. You can change these properties as you gain a deeper understanding of the product’s features. 
A fantastic feature of Access is that the design view can always be used to modify an existing table structure, regardless of which technique you use to create the table. 

Create a table:
  1. Click the Create tab. 
  2. Click Table Design. 
  3. Type a name in the Field Name column for each field you want—for example, CustomerName. 
  4. In the Data Type drop-down list, select a
    data type for each field—for example, Short Text. (At the end of this exercise, a table describes the data types that are available.) 
  5. Click Save. 
  6. Provide a name for the table, and click OK. 
  7. If you have not created a primary key, you will be prompted to add a key. Click Yes to add a primary key. 
  8. After saving your table, the new ID primary key is added to the table. 
  9. The table now appears in the navigation pane. 
TIP: Designers sometimes begin table names with a prefix, such as tbl—for example, tblCustomers—to distinguish tables from queries (which are prefixed with qry) when both appear in one list. Having a naming convention is a good idea when you’re creating complex databases. 

TIP: Because there are several different choices here for numbers, you might find it easiest to use a Long Integer for whole numbers and use a Double for numbers with decimal places. 

TIP: If you know which field(s) would make a good choice for a unique primary key, select the fields and click the primary key button. A primary key must be unique for each record in the table and cannot be null (blank). You can use more than one field to create a composite primary key, where each field doesn’t contain unique values, but the combination of fields will always be unique.