Pages

Monday, 2 April 2018

Open, Rename, Duplicate, Or Delete A View Access 2013

When you display a view in Access, you can use the Settings/ Actions charm next to the view name to perform basic operations on the view. The options are Open In Browser, Edit, Rename, Duplicate, and Delete. 
When you choose Open In Browser, the view immediately displays in the browser window, saving you from having to locate you to change the name of the view, the Duplicate option makes a copy of a view, and the Delete option removes the view. 
This task will demonstrate how, when editing a view, you can switch to the table design and modify the structure of the table. 

Change a table design when editing a view:
  1. Click the Settings/Actions charm. 
  2. Select Edit. 
  3. If you are editing a view and displaying the Field List, you will see a link to edit the design of the table. Click the Edit Table option to change the design of the table. 
  4. Add a new field name. 
  5. Click Save. (You will not be able to save changes until you close any open views that refer to this table.) 
  6. Click the tab with the open view. 
  7. Close the view. If you now repeat step 5, you can save the changes to the design of the table.
TIP: If you switch to design view on the table, you will find that you need to close any open views before you can save any changes that you make to the table. 

Designing With A Blank View Access 2013

A blank view will create a presentation that does not display any fields from the table. This can give you a greater amount of control over what data is displayed, although it might involve more work in creating the view. 
Normally, a view displays information from the table associated with the selected table and related tables, but you can add a view that displays information from an unrelated table. In this example, we will add to the Products table View Selector a view that allows you to browse through the Category records but not display any associated record from the Products table. 

Create a blank view:
  1. Locate the object in the Table Selector. 
  2. Click the plus sign. 
  3. Type a name for the view, select Blank as the view type, and then select the record source. 
  4. Click Add New View. 
  5. When the new view is displayed, click Edit. 
  6. Click the Data icon. 
  7. Change the record source. 
  8. Close the Data popup window. 
  9. In the Field List, select a field. 
  10. Drag the field onto the blank view. 
  11. After you have saved the changes, the View Selector for the table has a view that displays information from another table without involving the table associated with the selected table name caption in the View Selector.

Designing With A Summary View Access 2013


A summary view allows you to summarize data by calculating a sum or average. You need to choose a table or query with numerical fields before you can work with many of the best features in this type of view. 

The Record Source field (where the view gets the data) allows you to choose from the table or any queries that include the table. 

If you have been creating tables by using templates, you might already have seen examples of a summary view, which would appear as a third available view on some of the tables. When you create your own tables, a Web App will automatically create a List view and a Datasheet view. 

Create a summary view:
  1. Locate the object in the Table Selector. 
  2. Click the plus sign. 
  3. Type a name for the view, select Summary as the view type, and select the record source. 
  4. Click Add New View. 
  5. When the new view is displayed, click Edit. 
  6. Click the control list shown on the left. 
  7. Click the Data charm next to the list control. 
  8. In the Data popup window, choose the field to group by, type a header for the calculation, and choose the field and calculation type. 
  9. Close the Data popup window. 
  10. Click the details area on the right. 
  11. Click the Data charm next to the details area. 
  12. Define the fields to summarize. 
  13. When displaying a summary view in a browser, click each record in the control list on the left to see the summary details on the right change to match the selected record. 
CAUTION: After you have closed any Data popup windows, you will see the fields and summary options displayed on the control list, but in the detail section on the right, you will not see any information displayed. You might be unsure about whether you have defined any choices in this detail section, so to check this, you need to re-display the Data popup window.

Friday, 30 March 2018

Designing With A Datasheet View Access 2013

A Datasheet view is the simplest view to create. This view tabu­lates the data and displays your fields as columns. Although it is extremely simple, when combined with the abilities to filter data, sort data, and reorder the columns, it is a very powerful method to quickly present a tabulation of your data. 


In a List Details view, before you can edit data, you need to use the action bar to put the record into edit mode. However, in the Datasheet view, you can edit data without doing this and move to the next record to continue editing another record, which automatically saves the changes from the previously edited row. This is a unique and very powerful feature of a Web App datasheet. 

The Record Source property (where the view gets the data) allows you to choose from the table or any queries that include the table. 


Create a Datasheet view:

1. Locate the table in the Table Selector. 
2. Click the plus sign. 
3. Type a name for the view, select Datasheet as the view type, and select the record source. 
4. Click Add New View. 
5. When the new view is displayed, click Edit. 
Format a field:
1. Click a field to format.
2. Click the formatting charm.
3. Change the formatting.

TIP: You can delete fields by pressing the Delete key. You can select multiple fields and move them as a group by using the Ctrl key, and add new fields by using the Field List.

Designing With A List Details View Access 2013

A view in a Web App is similar to a form in a desktop database. There are four types of views; List Details, Datasheet, Summary, and Blank. The List Details view is a powerful feature. In its simplest form, it has a vertical tabulation of the available records on the left side of the view, and when a record is selected, the record details are displayed on the right side of the view. 

The layout capabilities of this view mean that as you delete, add, or move fields, the layout automatically moves other fields to accommodate the position of the new fields, simplifying the process of altering the view. The Record Source field (where the view gets the data) allows you to choose from the table or any queries that include the table. 

Create a List Details view:

1. Locate the object in the Table Selector. 
2. Click the plus sign. 
3. Type a name for the view, select List Details as the view type, and select the record source. 
4. Click Add New View. 
5. When the new view is displayed, click Edit. 

TIP: In the lower part of a view, you may have a related item control (Orders in our example). To resize the control, click to select it (it will change color when selected); you can then grab the top edge of the control (the mouse shape will change when hovering over the edge) and resize the control. 

Remove fields:

1. Click a field. 
2. Hold down the Ctrl key to select multiple fields and labels. Press the Delete key to remove the fields. 
3. Select any other fields to be repositioned, and drag the fields to close up white space. 

TIP: By using the Ctrl key, you can select multiple controls and move them around the layout. After selecting the controls, move the mouse over the area until a crossing arrows symbol is displayed, and then click the left mouse button and drag the controls to a new position. As you move the controls around, other controls will change position, opening up a gap into which you can position the new controls.

Add fields:

Select a field from the Field List on the right side. 
Drag the field to a new position on the display area. 
As you move over other fields, they will make space to allow the new control to be positioned. 

CAUTION: Although you can select multiple fields in the Field List, when you use the dragging action to add the fields, only the first field will be added.

Creating A Lookup/Relationship Access 2013

A Web App allows you to create a lookup, which ties or relates data between tables. (The relationship concept is described in Section 4, “Creating a desktop database,” for a desktop database.) The Web App does not have a separate area for viewing relationships. You can view them for individual tables by selecting Modify Lookups in the Table Tools group on the Design tab. 

A Web App simplifies the design process by keeping you focused on creating lookups between tables. The terms relationship and lookup mean the same thing in a Web App, and in the popup window used to create the lookup, you will see options similar to those available for creating relationships in a desktop database.

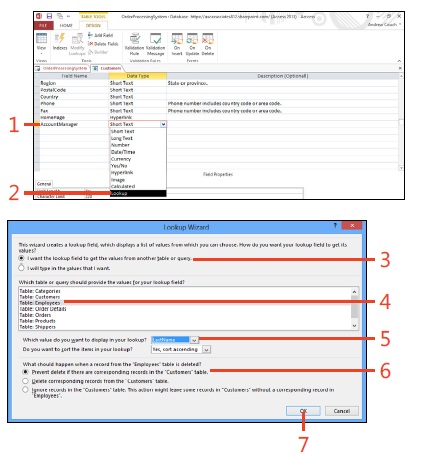
Create A Lookup:

1. On a blank line in the Field Name column, type a name for the lookup. 
2. In the Data Type column, select the Lookup data type. 
3. Select the option to look up data from a table or query. 
4. Select the table from which you want to get a value. 
5. Select the field to display. 
6. Choose how the related records are managed. 
7. Click OK. 

TIP: The lower part of the Lookup Wizard screen displays the optional rules for defining a relationship between the tables. 
Create a lookup 

8. Click Save. 
9. Click View. 
10. When viewing the data, you can see the Autocomplete control displaying the lookup data. 
11. In the browser, you can type data into the new field that was automatically added to the List Details view. 

TIP: If you have not changed the design of any views associated with your table, the added field automatically displays in the updated List Details view and Datasheet view for the table.

Tuesday, 27 March 2018

BLESSINGS OF SALAT AND SALAM | BOOK

| Salat-un-Nabi | Sahaba Karam | Prophet Muhammad ﷺ | Book |
Advantages:
Detail Of 40 Hadith Of Prophet Muhammad ﷺ About Reward Of Salat-un-Nabi Which Are Given Below To Read Complete Please Click On Topic...

S #
Topic
S #
Topic
S #
Topic
1
14
27
2
15
28
3
16
29
4
17
30
5
18
31
6
19
32
7
20
33
8
21
34
9
22
35
10
23
36
11
24
37
12
25
38
13
26
39
40

Disadvantages:
There Are 8 Different Hadith's About Disadvantages Of Not Reciting Of Salat-Un-Nabi ﷺ Whitch Are Given Below To Read Complete Please Click On Hahith Number...

Hadith – 1          Hadith – 2            Hadith – 3            Hadith – 4
Hadith – 5          Hadith – 6            Hadith – 7            Hadith – 8

Companions Of Prophet Muhammad ﷺ: 
Here are some Saying About The Salat-Un-Nabi ﷺ How It Is Best For Reader And How It Help The Reader's In His Life And In The Day Of Judgment. Which Are Given Below...
  1. Sayyiduna Abu Bakr Siddeeq رَضِىَ اللهُ تَعَالٰی عَـنْهُ
  2. Sayyidatuna ‘Aaishah Siddiqah رَضِیَ الـلّٰـهُ تَـعَالٰی عَـنْهَا
  3. Sayyiduna ‘Umar Farooq-e-A’zam رَضِىَ الـلّٰـهُ تَـعَـالٰی عَـنْـهُ
  4. Sayyiduna ‘Ali-Ul-Murtada کَـرَّمَ الـلّٰـهُ تَـعَـالٰی وَجۡـھَـهُ الۡـکَـرِیۡم
  5. Sayyiduna ‘Abdullah Ibn ‘Amr Bin ‘Aas رَضِىَ الـلّٰـهُ تَـعَـالٰی عَـنْـهُمَا